Inscrease Size Of Animated Gif Error In Photoshop Export
Importing and Exporting Image Files
In SketchUp, images can help your model come to life on-screen. You can import images to create custom textures that you apply to faces in your 3D model. And you can export images to share a model with friends, clients, or colleagues or perhaps in an online portfolio of your work.
Most of the details about importing images is covered in Creating a 3D Model, but this article outlines all the ways you import and export images and directs you to the pertinent details in other articles.
You can work with images in an array of file formats. In the following table, you find an overview of the raster versus vector images that SketchUp supports. Later in this article, you find a more detailed explanation of the differences between raster and vector files and tips for when to choose among the possible file types.
| Image Format | Raster or Vector? | Can Import into SketchUp | Can Export from SketchUp |
|---|---|---|---|
| JPEG | Raster | Yes | Yes |
| PNG | Raster | Yes | Yes |
| TIFF | Raster | Yes | Yes |
| BMP | Raster | Yes | Yes |
| PSD | Raster | Yes | Yes |
| TGA | Raster | Yes | No |
| Vector | Windows - No, MacOS - Yes | Yes | |
| EPS | Vector | Convert to CAD format | Yes |
Last but not least, you find detailed steps that walk you through the process and options for exporting raster and vector images in SketchUp or SketchUp Pro.
Table of Contents
- Importing images
- Understanding raster and vector images and their file formats
- Exporting a raster image
- Exporting a PDF or EPS vector image
Importing images
In SketchUp, you can import images in a few different ways, depending on how you want to use them in your model. Check the following articles for details:
- To trace an image with the SketchUp drawing tools for a floor plan or other drawing, see Tracing an Image.
- To import an image that you want to use as a custom texture in the Materials browser, see Adding Colors and Textures with Materials.
- To import a photo and apply it over a whole face, check out Sticking a Photo or Texture to a Face.
- To import images via the Match Photo feature, Matching a Photo to a Model (or a Model to a Photo) explains how in detail.
- To import a vector image as terrain, you need to export the vector image as a
.dwgor.dxffile in your image editor, such as Adobe Illustrator, and then follow the steps in Importing and Exporting CAD Files to import the vector image as geometry, rather than a 2D image.
Tip: You can also drag and drop importable files into the drawing area. After you drop the file, any relevant Import dialog box opens so you can select your desired options.
To manage file sizes and image quality, follow these tips:
- Size images no larger than 1024 x 1024 pixels. That's the maximum size of an image that can be imported into SketchUp. If you use an image that exceeds the maximum, SketchUp automatically downsizes the file using a medium-quality sampling mechanism. However, your image looks better if you size the photo yourself in an image-editing program like Adobe Photoshop (one that supports bicubic resampling).
- Crop your image to include only the portion of the image to be used. Doing so keeps your SketchUp file size small, especially if you plan to use the image as a custom texture.
- Save the file as a high-quality JPEG file.
Understanding raster and vector images and their file formats
In SketchUp, you can import and export raster image files. In SketchUp Pro, you can also export vector images. If you're unfamiliar with the differences among image formats and the image file formats that SketchUp supports, this section introduces you to the basics.
- Raster images are made up of square, colored pixels that combine to create an image. Because a raster image has a certain number of pixels, you can usually decrease the image size and still have a good-looking image. However, the more you increase the image size, the more blocky a raster image looks. A raster image's resolution tells you how many pixels the image has. In SketchUp, you use raster images for textures, backgrounds, watermarks, and so on. You can export a model view as a raster image file to share with a client, create a presentation, and much more.
- Vector images don't have a resolution. Instead, mathematical algorithms work behind the scenes to create a vector image. The advantage is you can make vector images as big or small as you like, and they still look good. However, vector images work best with lines, curves, and flat colors. Vector images are useful for creating a set of 2D construction documents, plotting a perspective in a large format, or importing into vector illustration software for further editing. (LayOut has vector image-editing capabilities.)
SketchUp supports several different raster image formats, each of which has its own advantages. Here's a quick overview of the raster file formats that work with SketchUp:
- JPEG (Joint Photographic Experts Group): Many applications, computer platforms, and digital cameras support JPEG files, which have the file extension
.jpg. JPEG compression can reduce file size to a fraction of other formats, which is useful when you need to email an image or share it on a website. However, compressing a JPEG image discards information from the image, and you can create a blocky or low-quality image if you apply too much compression. - PNG (Portable Network Graphics): The PNG format was developed for transferring images efficiently over the world wide web without data loss. Unlike JPEG, PNG compression doesn't discard data from the image file. When you export PNG files from SketchUp, the image can maintain the transparency of materials such as glass.
- TIFF (Tagged Image File Format): TIFF is primarily used for high-resolution printing, and thus, images in the TIFF file format hold a lot of image data but also tend to be large. SketchUp supports as wide a range of TIFF formats as possible, and you should test compatibility with other applications before exporting to TIFF file. 1-bit raster files, or TIFF files with GIF encoding, are not compatible with SketchUp. You can also export TIFF files with transparency.
- BMP (Bitmap): The BMP file format was created for Microsoft Windows operating systems primarily as the format used for the Microsoft Windows clipboard and for viewing (especially as wallpaper). BMP does not use compression. Therefore, BMP can be useful for creating temporary files to be further modified in other applications. However, BMP tends to create very large files that are not suitable for archive, web, and email use.
- PSD: The PSD format is native to Adobe Photoshop. You can only import images in this format. However, PSD files tend to be large, so consider whether exporting a PSD file to JPEG or PNG format first would help improve SketchUp's performance.
Note: SketchUp 2016 and later versions no longer support the EPix file format for export.
Tip: Most of the time, you likely want to import or export a JPEG or PNG image. Both of these formats keep file sizes small, can be viewed on any system, and can display lots of colors and details. The JPEG format is slightly better for photos with lots of details and color variations, whereas the PNG format is excellent for images with a more limited color palette than a photo. If you're printing a high-resolution image of your model, check your printer documentation for the best file format or ask your printing service whether you should use TIFF.
SketchUp Pro enables you to export to two vector formats:
- EPS (Encapsulated PostScript): This format is based on PostScript, a graphics description language that Adobe developed as a standard way for graphics programs and print devices to communicate. EPS is widely used in the graphic design and publishing industries.
- PDF (Adobe Portable Document Format): PDF is the open standard for worldwide electronic document distribution. PDF preserves a source document's fonts, formatting, graphics, and color, regardless of the application and operating system used to create the document. Also, PDF files are compact, and anyone with free Adobe Acrobat Reader software can view, share, navigate, and print PDFs.
Exporting a raster image
To export the current view of your SketchUp model as a raster image, follow these steps:
Windows
- Select File > Export > 2D Graphic. The Export 2D Graphic dialog box appears.
- Navigate to the location where you want to save your image.
- (Optional) In the File Name box, type a name for your image file. By default, the image file has the same name as your SketchUp model.
- From the Export Type drop-down list, select a raster file type. The raster options are JPEG, PNG, TIFF, or BMP.
- (Optional) Click the Options button to open the options dialog box for your selected file type. The options for each file type are listed in the following sections. Click OK to save your options and return to the Export 2D Graphic dialog box.
Note: There is a size limit when exporting; the maximum for height and width is 9,999 pixels.
- Click Export and your file saved in the location you selected.
MacOS
- Select File > Export > 2D Graphic. An export dialog box appears.
- Navigate to the location where you want to save your image.
- (Optional) In the Save As box, type a name for your image file. By default, the image file has the same name as your SketchUp model.
- From the Format drop-down list, select a raster file type. The raster options are JPEG, PNG, or TIFF.
- (Optional) Click the Options button to open the options dialog box for your selected file type. The options for each file type are listed in the following sections. Click OK to save your options and return to the export dialog box.
- Click Export and your file saved in the location you selected.
JPEG options
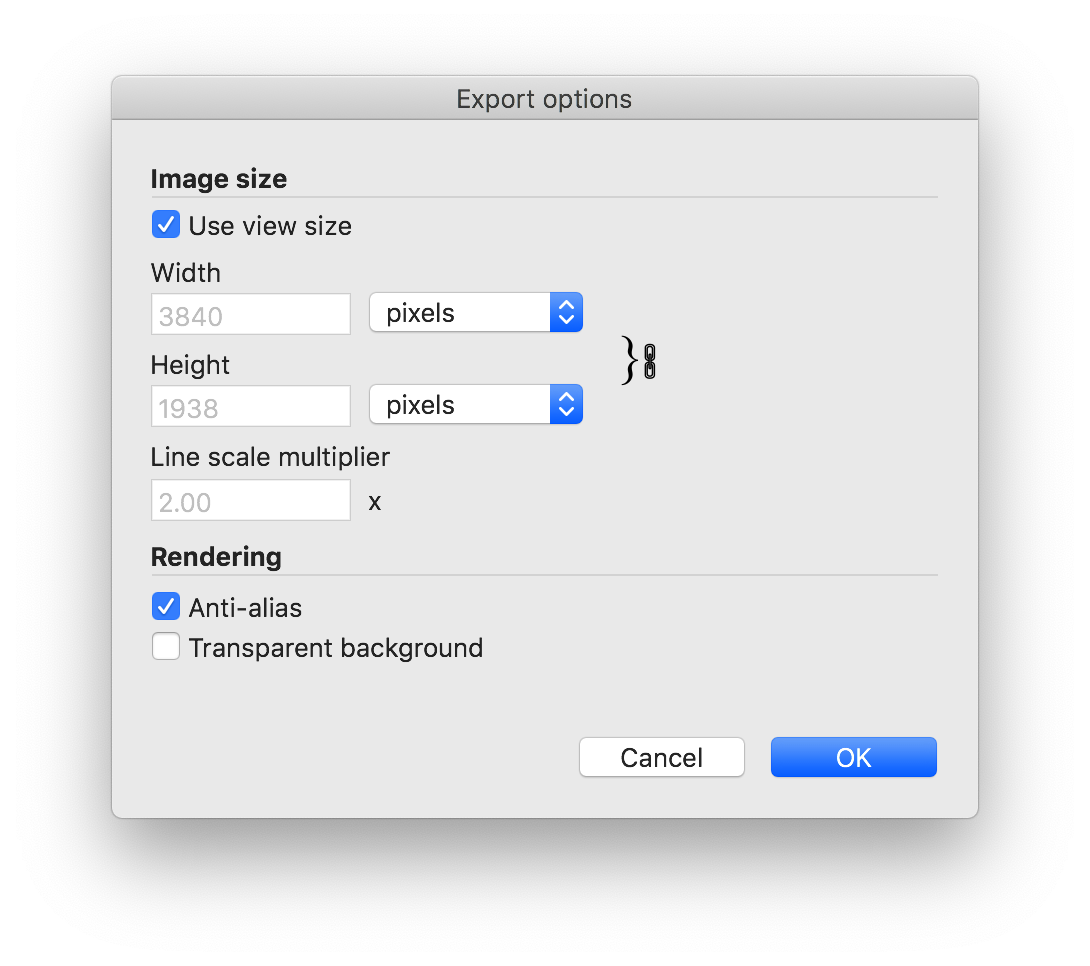
When you export an image in JPEG format, you have the following options, as shown in the following figure:
Windows
- Use View Size checkbox: Keep this selected to output your image at a 1:1 scale.
- Width and Height boxes: Clear the Use View Size checkbox, and you can type a custom width or height in pixels in the Width or Height box. If you type a width, the height value adjusts to maintain your image proportions. On macOS, you can click the chain icon to unlock the aspect ratio and type a custom value in both the Width and Height boxes.
- Line Scale Multiplier: Clear the Use View Size checkbox, and you can also scale lines in an exported image. The default is 1x and the minimum is 0.25x. The higher the value, the thicker the lines will appear. For larger images, you might want to increase the line scale to more than 1 so that lines in your exported image look similar to those in the drawing area.
- Anti-alias checkbox: Selected by default, this option tells SketchUp to smooth jagged lines and pixelated artifacts in the exported image. Clear this box if you don't want to use anti-aliasing.
- JPEG Compression slider: Drag the slider to indicate how much compression you want to apply to your image. More compression creates a smaller file size but can degrade the image quality, and less compression produces a better quality image but a larger file.
MacOS
- Use View Size checkbox: Keep this selected to output your image at a 1:1 scale.
- Width and Height boxes: Clear the Use View Size checkbox, and you can type a custom width or height in pixels in the Width or Height box. If you type a width, the height value adjusts to maintain your image proportions. On macOS, you can click the chain icon to unlock the aspect ratio and type a custom value in both the Width and Height boxes.
- Line Scale Multiplier: Clear the Use View Size checkbox, and you can also scale lines in an exported image. The higher the value, the thicker the lines will appear.
- Anti-alias checkbox: Selected by default, this option tells SketchUp to smooth jagged lines and pixelated artifacts in the exported image. Clear this box if you don't want to use anti-aliasing.
- JPEG Compression slider: Drag the slider to indicate how much compression you want to apply to your image. More compression creates a smaller file size but can degrade the image quality, and less compression produces a better quality image but a larger file.
PNG and TIFF options
SketchUp Pro - PNG & TIFF Export Options
When you export an image in PNG or TIFF format, you have these options, as shown in the following figure:
- In the Image Size area, select how you want to size your image. The options are identical to the Image Size options for JPEG files.
- Line Scale Multiplier: Clear the Use View Size checkbox, and you can also scale lines in an exported image. The default is 1x and the minimum is 0.25x. The higher the value, the thicker the lines will appear. For larger images, you might want to increase the line scale to more than 1 so that lines in your exported image look similar to those in the drawing area.
- Anti-alias checkbox: When this option is selected, it smooths jagged edges and artifacts. To turn it off, clear the Anti-alias checkbox.
- Transparent Background checkbox: If you want the model's background to appear transparent, select the Transparent Background checkbox.
SketchUp Web - PNG & TIFF Export Options
In SketchUp for Web, you can take a 'live preview' snapshot of your SketchUp model in order to export a PNG image file with the image size and composition you want. Go to the File > Export > PNG to get started:
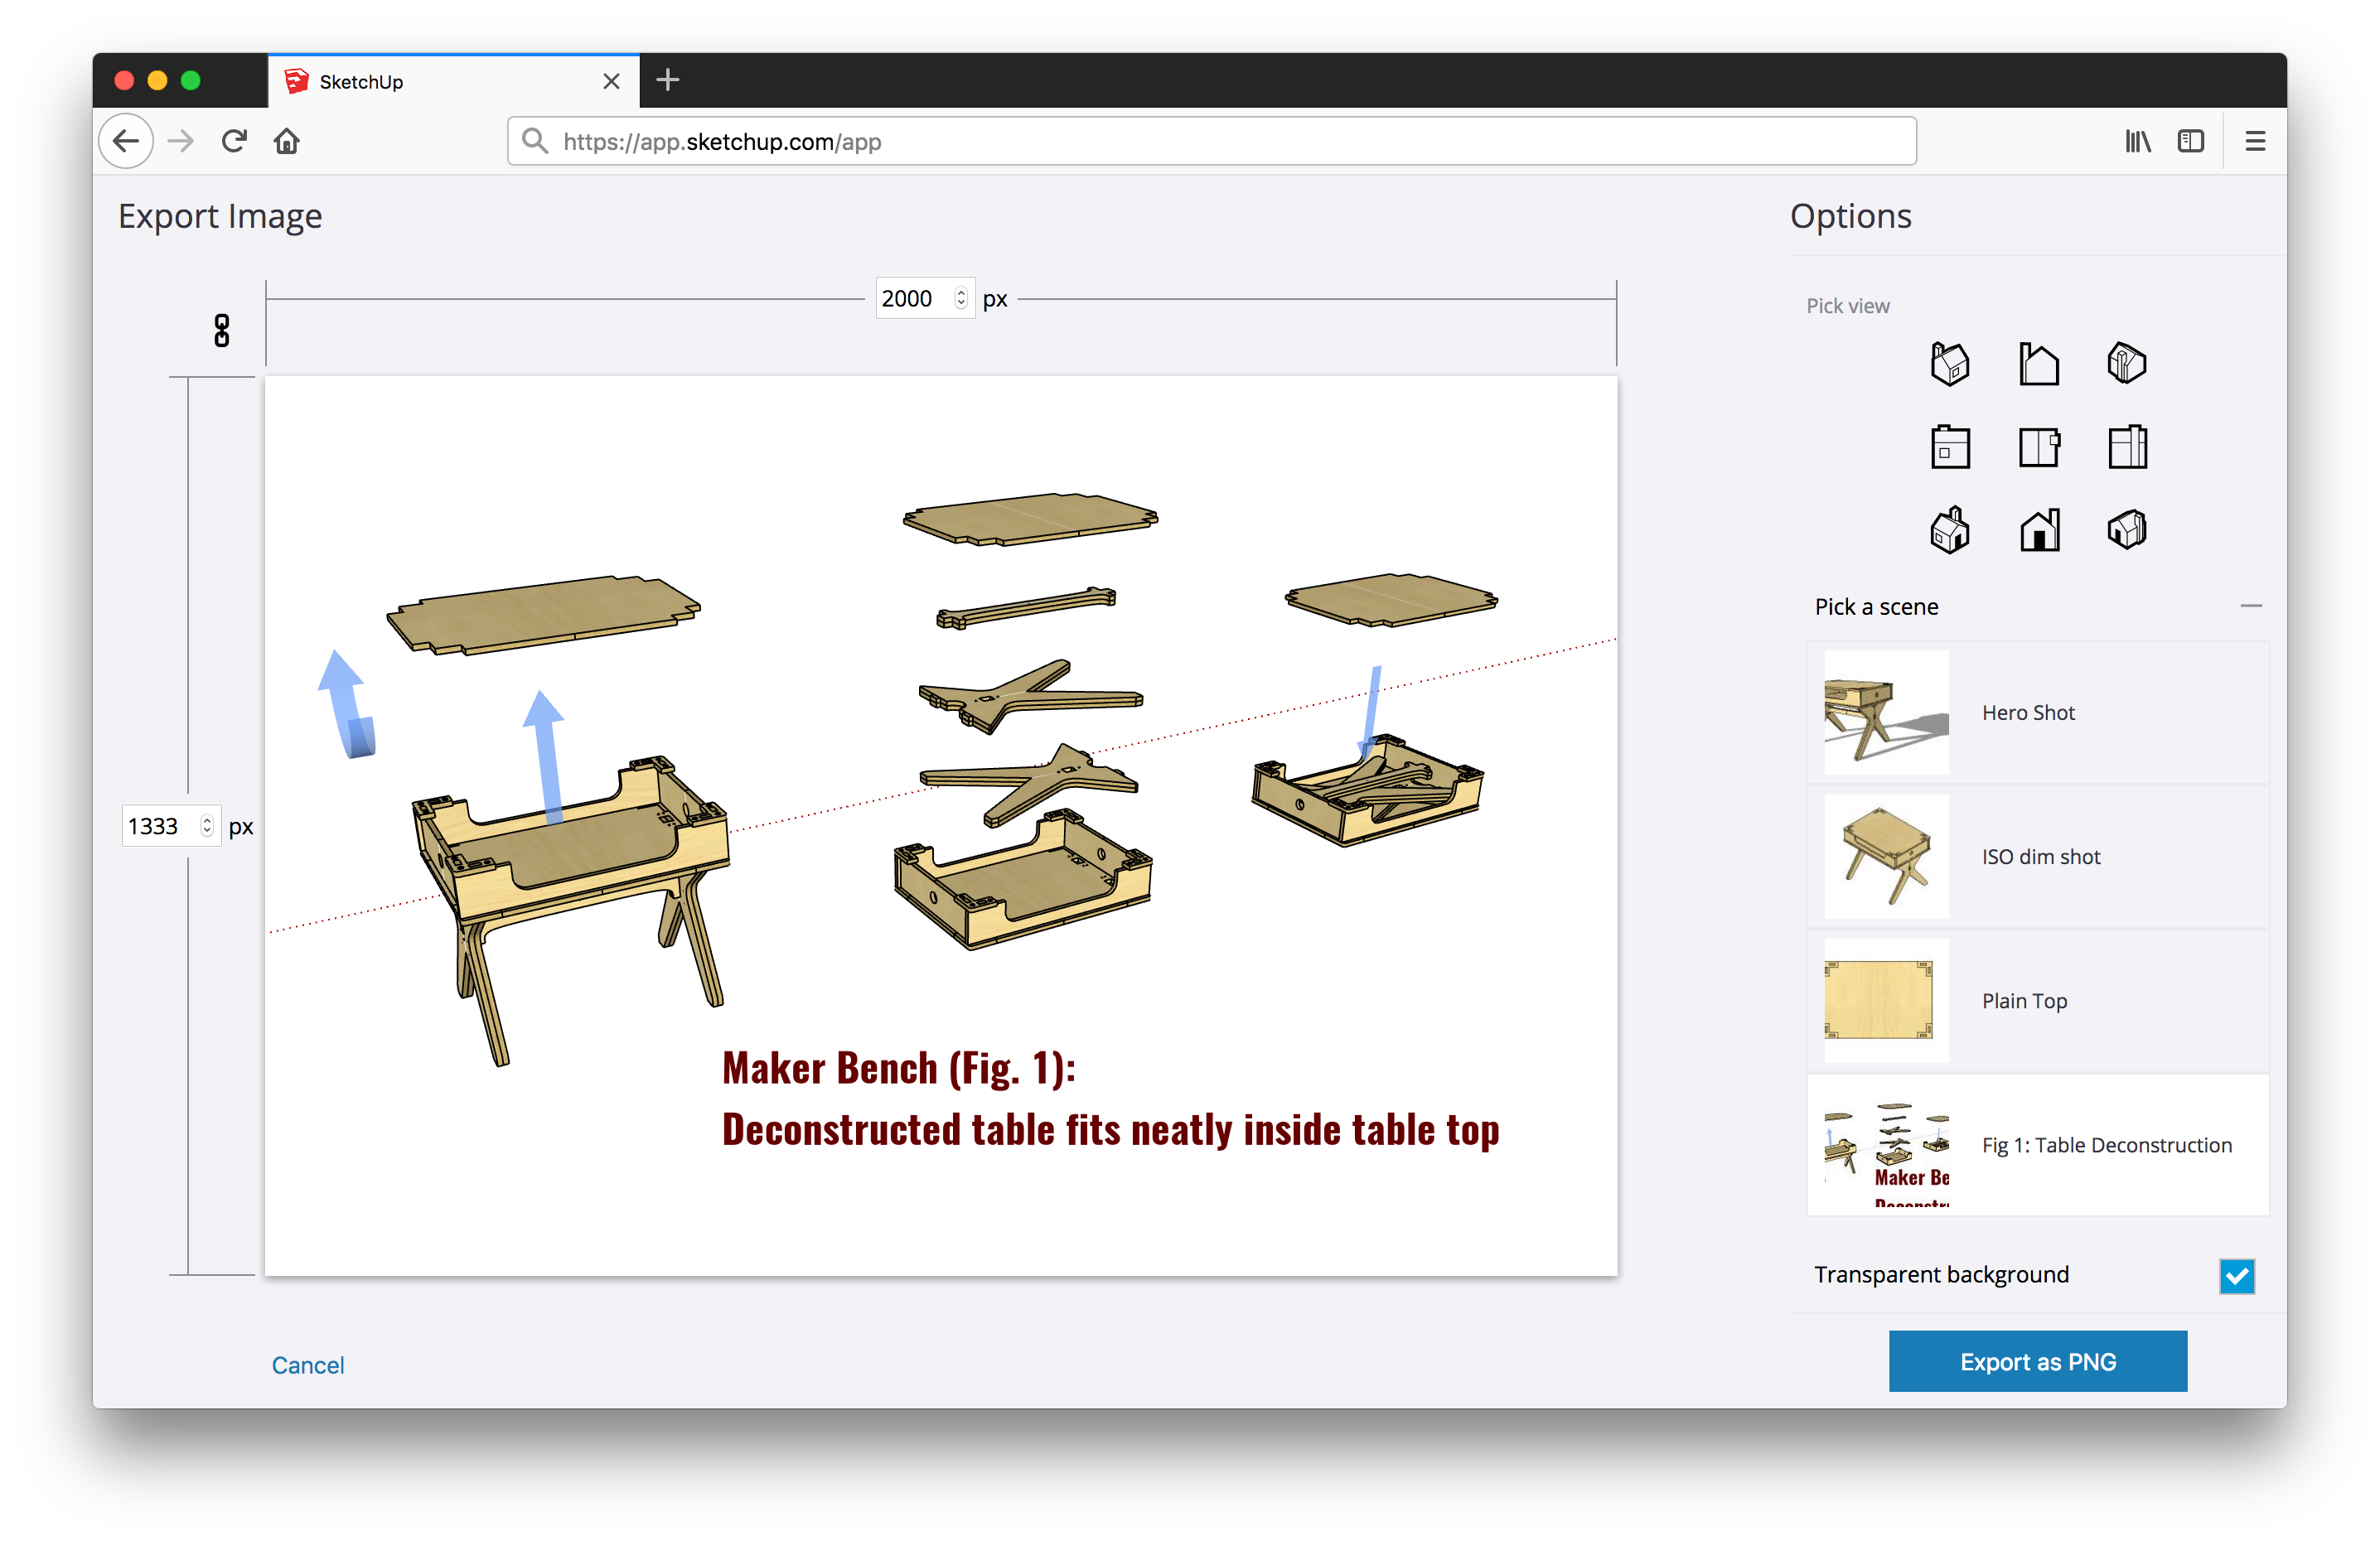
In this live preview canvas, you can still use SketchUp's basic navigation controls (with default keyboard shortcuts) to orient and compose your model as you'd like to see it in your exported image file. Orbit (O), Pan (H), and Zoom (Z) are all available, and you can also use the scroll wheel on a 3-button mouse.
To size your image to an exact pixel size, simply click on the pixel size input fields and type in the pixel size you'd like to see for image width and height. Or click the chain link icon to lock the aspect ratio as you make your desired image larger or smaller by changing only one field.
If you choose an image size that's bigger than your browser tab or too small to manipulate, the preview will scale your image so that it still fits in your browser. The image you export will be at the specified pixel size, even as your preview is scaled up or down.
You also have the option to export PNG's with a transparent background. When you choose this option, the background in your preview will switch to all white, and your exported image will feature only model geometry with a completely transparent background.
Tip: If you've created scenes for your SketchUp model, they are accessible for you to choose from in the image export preview canvas. And when you export an image, SketchUp will create a new scene -- (Last Image Export) -- that you can save for use in future exports. Be sure to rename the scene, as this scene will be overwritten the next time you export an image.
BMP options (Microsoft Windows only)
When you export a file as a BMP, you can adjust the image size, line scale, and turn off anti-aliasing. The options work just like the Image Size, Line Scale, and Anti-alias options for JPEG files.
Exporting a PDF or EPS vector image
In SketchUp Pro, you can export your models as 2D vector drawings in either PDF or EPS format. However, a few model features or details may be lost or change in the export process. A better option is to send your SketchUp model to LayOut and print from that application instead.
If you do need to print your PDF or EPS file from SketchUp, you might notice the following issues:
- Graphic features that rely on raster images, such as textures, shadows, smooth shading, backgrounds, and transparency, can't be exported to PDF and EPS vector files.
Tip: If you want to create a raster-based PDF that preserves textures, try printing to PDF from SketchUp instead of exporting a PDF vector file. Or, export a raster image file instead of a vector image file. For details about printing in SketchUp, see Printing Views of a Model in Microsoft Windows or Printing Views of a Model in Mac OS X. For details about exporting raster images, see the earlier section, Exporting a raster image.
- When other geometry hides text and dimensions, the text and dimensions appear on top of the geometry in the exported file. When edges of the SketchUp drawing area clip part of a text or dimension entity, it's not exported at all.
- Some text may appear in a slightly different font in the exported file.
To export your current model view to a 2D vector image, follow these steps:
Windows
- Select File > Export > 2D Graphic. The Export 2D Graphic dialog box appears.
- Navigate to the location where you want to save your image.
- (Optional) In the File Name box, type a name for your image file. By default, the image file has the same name as your SketchUp model.
- From the Export Type drop-down list, select a vector file type. Your options are PDF or EPS.
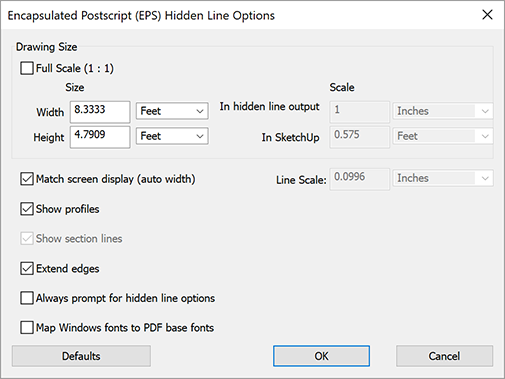
- (Optional) Click the Options button to open the options dialog box for your selected file type. The options for both PDF and EPS files are the same, although in the following figure you see the dialog box for EPS files. The following list explains each option. Click OK to save your options and return to the Export 2D Graphic dialog box.
- Click Export and your file saved in the location you selected.
When you select PDF or EPS as the format for your exported 2D graphic, you have the following options in the Hidden Line Options dialog box that appears:
- Full Scale checkbox: Select this checkbox for a 1:1 scale.
- Width and Height boxes: Enter a value in these boxes and use the drop-down lists to select your desired unit.
- Scale options: To use these options, your model must be in Parallel Projection mode or a two-point perspective and you need to select a standard view from the Camera > Standard Views submenu. The value for In Hidden Line Output indicates how the exported geometry is sized, and the In SketchUp value is the actual measurement of the geometry. For example, you might enter 1 inch in In Hidden Line Output and 4 feet in In SketchUp to create a 1:4 scale.
- Line Scale Multiplier: Clear the Use View Size checkbox, and you can also scale lines in an exported image. The default is 1x and the minimum is 0.25x. The higher the value, the thicker the lines will appear. For larger images, you might want to increase the line scale to more than 1 so that lines in your exported image look similar to those in the drawing area.
- Show Profiles checkbox: Select this checkbox if you want lines displayed in profile to appear thicker in the exported vector file. When you clear the Show Profiles checkbox, all the lines have a consistent width.
- Match Screen Display checkbox: When Show Profiles is selected, you can leave Match Screen Display (Auto Width) selected to let SketchUp determine the width of profile lines. Clear the Match Screen Display (Auto Width) option, and you can set a width manually in the box to the right of the checkbox.
- Show Section Lines checkbox: This checkbox is available only when you export section slices, as explained in Slicing a Model to Peer Inside. These options aren't available when you export PDF or EPS files.
- Extend Edges checkbox: Select this checkbox if your model style uses edge extensions and you want them to appear in the exported file. If you plan to import your vector image into a CAD program, you may want to clear the Extend Edges option, because some CAD applications have problems recognizing endpoints and intersections when a file uses SketchUp edge extensions. When Extend Edges is selected, the Match Screen Display (Auto Width) checkbox is also selected by default. When selected, the extension line width in the exported file matches what appears on-screen in the SketchUp drawing area. Clear this option to set a custom width in the box to the right.
- Always Prompt for Hidden Line Options: Select this option to automatically display the Hidden Lines Options dialog box whenever you export a PDF or EPS file.
- Map Windows Fonts to PDF Base Fonts: When exporting a PDF file, select this checkbox to tell SketchUp to map any font it can't find to a PDF base font.
- Defaults button: Click this button to restore the options in the dialog box to their default settings.
MacOS
- Select File > Export > 2D Graphic. An export dialog box appears.
- Navigate to the location where you want to save your image.
- (Optional) In the Save As box, type a name for your image file. By default, the image file has the same name as your SketchUp model.
- From the Format drop-down list, select a vector file type. Your options are PDF or EPS.
- (Optional) Click the Options button to open the options dialog box. The options for both PDF and EPS files are the same, and the following list explains each option. Click OK to save your options and return to the main dialog box.
- Click Export and your file saved in the location you selected.
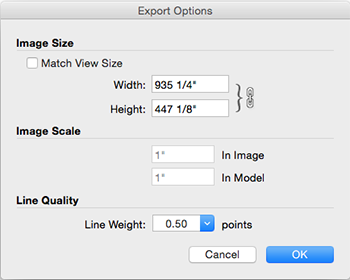
When you select PDF or EPS as the format for your exported 2D graphic, you have the following options in the Export Options dialog box that appears:
- In the Image Size area, select the Match View Size checkbox if you want the width and height of your exported image to correspond to the on-screen dimensions. When Match View Size is deselected, you can enter your own width or heigh value in the respective boxes. By default, SketchUp maintains the image's aspect ratio (so entering a width changes the height and vice versa), but you can click the chain icon to enter custom values in each box. Note that changing the aspect ratio distorts your image.
- In the Image Scale area, you can set a scale if your model camera is set to Parallel Projection and you select one of the standard views from the Camera > Standard Views submenu. The first measurement, labeled In Image, is the measurement of the exported geometry. The second measurement, labeled In Model, is the actual measurement of the object in real scale. For example, you might enter 1" inch in In Image and 4' in In Model to create a 1:4 scale. para
- In the Line Quality area, enter a value in the Line Weight box to set a value for all profile line weights.
Inscrease Size Of Animated Gif Error In Photoshop Export
Source: https://help.sketchup.com/en/sketchup/importing-and-exporting-image-files
0 Response to "Inscrease Size Of Animated Gif Error In Photoshop Export"
Post a Comment